You know all those little tiny scraps your saving because you consider it sacrilege to throw any piece of fabric out even though you have no idea what you’ll use them for? Well, this project may solve that predicament.
Finished size is about 3” x 6 1/4”. These fit my specs perfectly, but if you have bigger specs, adjust accordingly.
(First of all, pardon my scorched ironing board cover in the photos…)
You’ll need:
Fabric scraps for the hexagons
Freezer paper (or regular paper if you don’t have freezer paper)
6 3/4″ x 6 3/4″ scrap of heavy weight fusible interfacing
6 3/4″ x 6 3/4″ scrap of fabric for the lining
Needle, thread, pins, iron, printer, etc.
Start by making a template for the case. You can either print mine as a JPG and Word Document. The Word Document should be to scale but if not, and if you use the JPG version, you’ll have to adjust the sizing. There is a one inch scale as a guide. Or draft your own by cutting a 6 3/4” x 6 3/4” square from a piece of paper and round two corners. I used a glass to round the corners.
Next cut two 8 1/2 x 11” pieces of freezer paper. Then print the hexagon templates via Cia’s Palette being sure the image prints on the matte side of the paper. Cut out the hexagons (I used about 30 hexagons—so you need two sheets.) There are plenty of other hexagon templates you can find via a Google search, or as always, you can make your own.

Pin the hexagon to the fabric scrap with wrong side of the fabric facing the matte side of the paper.

Cut a 1/4″ allowance around all edges.

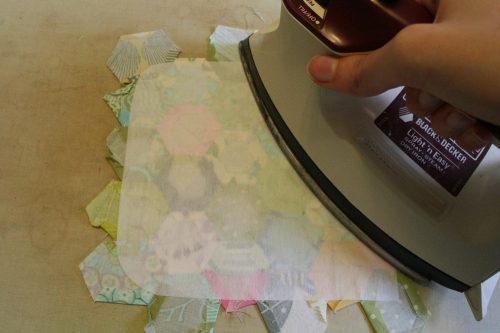
Iron one side down. The waxy side of the freezer paper will help hold down the fabric. Nifty, huh?

Repeat all around. Remove pin.
(If you don’t have freezer paper, you can print on regular paper, simply stitch the edges down instead of ironing them. A simple Google search for ‘English Paper Piecing’ should provide plenty of info.)
Repeat for the rest of the hexagons in various prints.


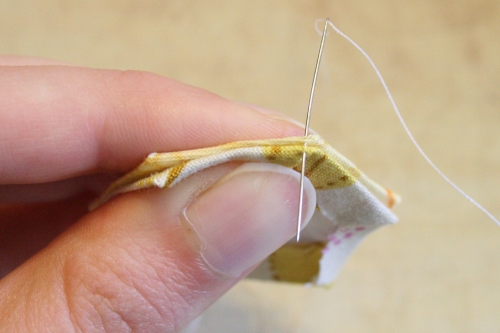
With the right sides of two hexagons together, sew the two sides of the hexagon together by hand using a tiny whip stitch.


Open it back up and add another hexagon to the next edge. Whip stitch that one too.


To do this third seam, fold the one hexagon in half to butt the two sides of the other hexagons together. This is so the finished product will lay flat.
Continue for the other hexagons.


For this project, I made do with 30 hexagons. Check to make sure it will cover the whole template. Add additional hexagons if needed.

Carefully remove the freezer paper from all the hexagons.

Trace the template shape onto the interfacing and cut out. Next iron the interfacing on the back side of the hexagons, being sure there is extra on all sides.

Cut off extra fabric. Flip over and iron again.
I forgot a photo for this step because I forgot to do this step but stitch about 1/8” of an inch along the one flat side. This will help keep the hand stitched seams from pulling apart when you turn it inside out later. It’s not absolutely necessary but recommended.

Fold in half, right sides together, and pin. Sew around edges as seen in photo.
Do the same for the lining, folding in half, right sides together and stitch, except leave an opening at the bottom. (Sorry I forgot a photo for this step as well.)

Turn the outer piece right side out. Use something like blunt scissors or a crochet hook to poke out the edges. Iron out any wrinkles.


Slip the outer piece inside the lining as seen. (In this photo you can see where I left the opening in the lining.)


Pin and stitch around the top. My machine isn’t narrow enough to slip it over the base thing-y, so I had to maneuver it a bit.

Pull the outer piece out through the bottom opening. Don’t tuck the lining in yet.

Whip stitch/Hidden stitch the opening closed.
Now you can tuck the lining in, again using a long, blunt object to push out the seams. You can also top stitch around the opening if you want.
(For personal use only, please.)
Questions, or errors, let me know.
If you make it, please share. I’d love to see. :)


lovely project! your fabric selections seem perfect for hexagons. thanks for sharing a tutorial i will soon try.
what a cool tutorial and such pretty results! thanks for sharing.
Since I cannot find my glasses case for the life of me right now I think this tutorial is moving right to the top of the docket!
Love this! I wonder if you could add a drawstring or flex shell to the top to keep it closed? Can’t wait to try this out!
love it! so tiny but so perfect! thanx for your nice comment on my purse..I’ll be making more!!
I think you’ve just given me my gift idea for my grandma’s christmas gift! hoorah! Thanks!
Awesome tutorial! I’ll have to dig through my Nanny’s scraps…
Just a few words for you here… you are SO patient!
fricken!
Patient!
You’re magical!
I don’t have a case for my glasses, maybe I should do this!
How cool, thanks for sharing!!! I’ve always wondered how to sew those.
great job! if I made one of these, I might actually put my glasses in a case instead of throwing them in my purse!
this is wonderful! thankyou!
thanks for tutorial, i like it
Far Out! I’ve been wanting to get my feet–um fingers–wet in the piecing patchwork world. And you’ve served up MY VERY FAVORITE pattern! I love, love, love the Grandmother’s Flower Garden quilts from the 30s. Thank you so much for this fantastic tutorial! I humbly bow to thee…8′)
That is really pretty!
Hi Liesl,
Loved your tutorial. I used it as inspiration for my glasses case over at meandmy2guys. I didn’t paper piece this one – although I do have quite a stack of 1inch hexagons sitting around. I put a bit of wadding in and quilted it instead.
Thanks for the tutorial – I really liked the shape of your case!
Bree
Thanks for the great tutorial, i like hexagons very much.
Thank you for the great tutorial. I used it for one of my Christmas presents last year. And my brother has already requested one too =) I especially enjoyed the english paper piecing – a technique that I have never used before.
That’s great, a fab glasses case thanks for the inspiration :-)
WE love this glasses case, fantastic!
Wow what a glasses case made with love. This case sure does look pretty and takes quite an effort to make. This would be fab as a gift to someone special as they would know that the glasses case has taking time to make so they are obviously ver important. Thanks for the idea and sharing.
I love this so much! I’m gonna make one for my mom’s reading glasses… she’ll love it! Thanks so much for sharing this tutorial with us!!!
I did it! I’d send in a picture only I don’t know how. Anyway, thanks for the tutorial. My scrap bag lost a few pieces and my music glasses have a new home. And I finished a sewing project, which is huge for me!